

3. Gathering photos, videos and stories
CARE’s communications work in emergencies relies on strong human content shared in a regular and timely manner by CARE staff on the ground and CARE communicators. This content is used for CARE fundraising, social media, reporting and advocacy work as well as pitching to journalists to raise public awareness and showcase CARE’s work.
This content is most frequently in the form of photo, video, written stories and audio materials. Below are some tips and guidance on how to gather the most powerful, compelling and ethically sourced content in a humanitarian emergency.
All of CARE’s digital assets are available on our global database CAREImages and communications expert working on emergencies should be sure to upload all photo and video content gathered to the CAREImages site for sharing.
In a fast onset emergency that will receive significant media coverage, it can be crucial to hire a professional photographer (and possibly videographer) as quickly as possible in order to capture the situation and CARE’s response.
All photography and film commissions should be coordinated by the Lead Member, in consultation with the Country Office, with input from other CI Members and coordinated through the Secretariat. In a rapid onset emergency, it is the responsibility of the relevant tollow-the-sun (FTS) member to begin identifying, contacting and preparing a brief for photographers/videographers.
The initial judgement on whether to contract a photographer will be made by the Office-in-Charge of contract. If the initial decision is not to hire a photographer, this decision will be revisited if necessary, based on input from the Regional Communications Advisor CI Secretariat communications and other CI members.
Experience shows that the best results come from hiring one person for photography and another for film. The skill sets are different and it’s impractical for one person to juggle two sets of equipment or have to make a choice between one medium or another at a critical time. Where possible, country offices and Lead Members should aim to hire both skillsets, especially in emergencies with lots of high profile media attention. For smaller scale emergencies, or those with lower media profiles, the decision may be made to hire someone to focus on photo OR video, as most appropriate, rather than both mediums.
A list of existing, trusted photographers by location can be found on the CAREShares global communications hub here.
Once a photographer is contracted, the Regional Communications Advisor or Lead Member Media Manager (or deployed Emergency Communications Officer) will have primary responsibility for following up, providing the photographer with guidance and ensuring timely delivery in accordance with the TOR and CARE guidelines, but sharing this responsibility as appropriate in line with the follow-the-sun protocol for emergency communication (see previous section above).
Before commissioning a photographer, you should fully brief them on our photographic guidelines (contact the Lead Member for details).
Developing a photo brief
- Think through what is essential and must be photographed, and what would be nice to photograph but isn’t essential. Is there anything that shouldn’t be photographed?
- Photographer must be briefed on CARE’s consent policy, policy on communicating with vulnerable groups and provided with consent forms
- What access do you have and what is possible? You may need to do two commissions: one to show how the emergency has affected women and girls, and a later one to show what CARE is doing to help. Always remember that women and girls should be the main focus of any commission.
- Brief the photographer about the current situation and the key issues facing women and girls, as well as what we’re doing or planning to do to help.
- Be clear about the key stories you want covered, and where you’ll be using the photos. Do you want one woman’s story? A mother or elderly woman angle? A photo story of daily life? A particular shot for fundraising purposes? A shot to convey the immediacy or aftermath of fighting? These details will give the photographer a much clearer idea of what you want and he/she is more likely to be able to get you what you want.
- It’s very important that the photographer is briefed to ensure they approach people, especially those with additional vulnerabilities, in an appropriate manner.
- If you have specific media outlets in mind, tell the photographer.
- Give the photographer details of key contact names and phone numbers.
- Have those contacts been informed properly of their roles and responsibilities for the photographer’s visit?
- Include an outline of CARE’s photographic style and requirements for deliverables i.e format, captioning, file naming etc.
- Photographer should be briefed on how to upload images to CARE Images (and provided with access to do so)
- Remember to speak to the Lead Member’s communications team to get input into the brief as well as other relevant members.
- Share the brief with the country director and/or emergency response team leader
A TOR template for hiring a photographer/videographer in emergencies can be found on CARE Shares Global Communications Hub here.
When interviewing, photographing and videoing those affected by humanitarian crises on behalf of CARE International, it is imperative that meaningful, informed consent is obtained from the subject. Not only is this a legal requirement in many countries, but it is a moral obligation to ensure that those we interview and photograph are fully aware of where, how and what their image and stories could be used for in order to maintain the humanitarian principle of ‘do no harm’.
While legally, a signature or mark is important, the policy requires that all subjects be told, in a clear manner, how any materials may be used in a way that ensures they fully understand the implications. In the case of use by CARE, the subject(s) – once fully informed – can give consent orally in certain exceptional circumstances, but written consent in the form of a signature or mark is the policy standard.
Assessing risk to the subject
The levels of risk depend on what the context is, but as a general rule, you should always remove one of the ‘three pillars of risk’ when photographing vulnerable people including minors (under the age of 18). If the subject is a minor (under 18 years old), the minor’s parent or guardian must first be fully informed before signing on behalf of the minor. If a parent or guardian is not available, another adult in authority (such as teacher, mentor, community elder, etc.), who is believed to have the minor’s best interests in mind, may sign instead, and provide a clear indication of his/her relation to the child.
The three pillars of risk are:
- face/identity;
- exact location and;
- name
You should remove two or three if they are considered high risk (e.g. a child who is currently or formerly associated with an armed group, or a survivor of sexual assault).
If a decision to change the name of a vulnerable person is made, this must be clearly articulated in the materials, including associated captions, metadata information and notes, by using an asterisk * and noting *Name has been changed to protect identity.
It is important to note that there will be some instances when the subject is happy for their face to be shown in photos, but their story may be such that it is best for them that their face is not shown.
In breaking emergencies, it can often be challenging to obtain full written consent with people on the move and in distress. In these instances, recorded verbal consent can be used. Similarly, for subjects who are illiterate, oral recorded consent, finger print marks or other forms of marking can be used.
If in doubt, or you have any queries on CARE’s global consent policy, please contact the CI Secretariat communications team.
CARE’s consent policy and consent forms in English, French, Spanish and Arabic can be found here on the Global Communications Hub and in the annex section of the Toolkit below.
Getting good photo & videos
All images, both photo and video, should support the interview by visually capturing the activities and topics discussed by the CARE programme participants and those affected by humanitarian emergencies. Please see here for a handy two page summary of how to capture strong photos and stories and here for CARE’s photo/video standards.
Photo
What photos to take:
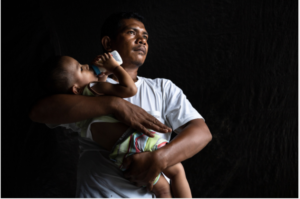
- Women and girls who have been displaced and living in makeshift homes or in front of homes that suffered destruction, Close-up portrait photos of individuals – portraits of faces, but also of them carrying out activities such as daily household chores.
- People in their homes (showing the challenges), but also show how they are trying to overcome challenges. Portraits of people receiving aid from CARE with quotes. Images of people USING the aid.
REMEBER TO: GET CLOSE, SHOW ACTION HAPPENING, PHOTOGRAPH ONE MAIN PERSON, CHOOSE WOMEN & GIRLS!
You can find more in-depth guidance on how to take good photos HERE
Quick tips
- Keep the camera steady. Make sure you and the camera are in a stable position, especially in low light.
- Don’t shoot into the sun.
- Make sure there are no trees or lamp posts, etc, that appear to be ‘sticking out of people’s heads’.
- Turn off the time and date settings on your camera
- Don’t bother shooting meetings!
- Set your camera to its maximum quality setting.
- Set your ISO to 100 when possible unless you are inside a dark space (avoid shooting above 800 – it becomes too grainy to use).
- Make sure you have enough space on your memory stick/card and batteries for the duration of your shoot.
- Vary your angle, move around. When you’re photographing children, get down to a child’s eye view – show how the world looks from their viewpoint.
- SHOOT, SHOOT and SHOOT some more.
- Don’t manipulate the photos. Any colour correction, etc, will be done by the Lead Member’s picture editor.
It is important to take many different images and angles which, when viewed together, can tell a story. The five types of images we want can fit into these categories:
- PORTRAITS: Close-ups of the person, some looking at the camera, some looking away. Sometimes these are of the person’s face only, sometimes of their whole body. Sometimes smiling, sometimes with a serious face.
- WIDE SHOTS: Images which capture the whole home or homestead, field, countryside, or show the context of life in this area.
- DOING SHOTS: Images of the person conducting the activities discussed in the interview, such as participating in project activities, planting seeds, pruning crops, selling produce, cooking a meal, feeding children, counting money, making notes in a business ledger, etc)
- RELATIONSHIP SHOTS: Shots that feature two or more people and show love and respect between family members – especially partners, or parents and children.
- DETAIL SHOTS: Close-up shots of things discussed in the interview. It may be seeds or coffee beans or crops, the bags of produce, the ledger, or even items they have purchased with their new income.
Images can certainly fit into more than one of the above categories, but it’s important to ensure that we have a few examples of each before we consider a story captured visually.
And remember: all images must adhere to CARE’s Safeguarding, Consent, and Child Protection Policies, as well as our Visual Guidelines. Images which do not follow these policies are serious violations.
Video
Emergencies represent a prime opportunity for us to place our own footage with the media. Our success will depend on two key things – the quality of the story and how quickly we can get it out there. In an emergency, CARE is competing for air time with news broadcasters and other NGOs.
Our real competitive advantage is the access we have to powerful testimonies – particularly from women and girls – in hard-to-reach areas, and our local contacts and knowledge. Film footage showing both the impact of the emergency on women and girl’s lives, and what we’re doing to help, is invaluable for our fundraising teams and their work with our supporters.
Video is also an important component of CARE’s social media work during an emergency. It is a vital way to raise awareness of an emergency and also to raise funds. For this type of content, ‘rough and ready’ phone footage can work, and short CARE staff recorded pieces to camera are powerful ways to show the impact, need and to call for funds and assistance.
What videos to shoot:
- CARE staff reporting from the affected areas e.g. https://www.youtube.com/watch?v=bdVaxP0WiQg
- CARE staff calling for funds/support to a given crisis e.g. https://www.youtube.com/shorts/VzZKoj0CiCg
- People using CARE aid items in their homes
- CARE staff at distribution sites or conducting other activities in the community
- Video interviews with programme participants and CARE staff https://twitter.com/CAREGlobal/status/1245632379399442432?s=20
- General footage: people on the street, in health centres, at home, at their places of work (i.e. selling food) or at distributions
- b-roll with general shots of the environment, people working, carrying out daily activities, any damage or impact of the humanitarian crisis. These can be pitched to media outlets or used to provide wider context in a social media video.
- TIP: hold your camera still for 20-30 seconds on one shot without moving/zooming in order to get good b-roll. Then repeat for the next shot!
- daily video blog of what day to day life looks like post-conflict/natural disaster:
- film morning, midday and evening routines i.e. food preparation (how is it different now?)
- you at work (or if you can no longer work what are you doing instead?)
- video of other family members engaged in activities like cooking, cleaning, chatting, playing, eating
- videos of you interacting with your family?
- footage of the streets, people in your communities
Technical Specifications of images & video
Captions and Credits
All photos captured and shared during a humanitarian crisis must have captions and be appropriately credited to the person who took the photo and CARE.
Detailed information identifying individuals in the photographs as well as dates, places, ages and relativity to CARE must also be included.
Good captions should include: location, context, details on what is happening in the photo and ideally quotes/testimony from any people captured in the photo e.g:
CAPTION: Ikhwan (34) holds his son, Muhammad Al Fatih (18 months), in a tent which his family have been living for the last two weeks, since their house was destroyed by the earthquake on 28 September 2018. Quotes “I don’t know when we’ll be able to live in a house again, our lives have been destroyed. All that I can think about right now is to protect my family.” Donggala, Indonesia
Proper CARE crediting protocol looks like:
[name of photographer/CARE] / e.g., Patricia Khoder/CARE
© [year] name/CARE / e.g., © 2018 Josh Estey/CARE
For more information on CARE photo captioning please see the CARE Brand Standards website
Delivery of photo and video
File size
Please always supply the highest resolution images possible. Only in extreme exceptions (when there is no other option) supply low resolution files. We need a minimum of 17MB (as a medium compressed file to email this translates to approximately 596k).
Dimensions for high res files: 6400 × 4267 pixels (24 MP) @300 DPI minimum
If your Internet connection is very slow and you have no other option you can downsize to:
- 5MB (this can be used for newspapers (a quarter-page print) and other small/less high-quality purposes (as a medium compressed file to email this translates to approx 208k)
- 900k for web use and Word documents.
Sending images
Ideally all images should be uploaded directly to the CAREImages website but CARE staff or the photographer taking the photos. If this is not possible, images can be send via Wetransfer, Dropbox, CAREUSA Box, Google Drive or Microsoft OneDrive.
In order to ensure images retain the best quality possible, it is best to avoid sending via Whatsapp or other messaging applications, as these compress the images and reduce image quality.
Signed CARE consent forms for each subject should be provided alongside images shared.
Consider also providing all photo and video on an external hard drive to the commissioning CARE member.
Naming
Images should be labelled using the following naming convention:
- Country code-Year-Photographer initials-4 digit sequential #
- i.e for Indonesia, country code to be used would be: {INDO}
- Four-digit year format (i.e. 2012, 2013)
- Example: KEN-2012-EH-0275, KEN-2012-EH-0276
Working with translators
Choosing the right translator is very important. They can mean the difference between gathering in-depth, compelling stories and missing vital information. Your translator is an extension of the interview subject’s voice, and may need to be selected based on the preferences of the subject, who may be more comfortable speaking to a woman than a man, or may be more articulate in a regional dialect which they should feel free to use.
- Before you start your work, discuss as a team how the interviewer, the photographer, and the translator will work together – especially discussing the needs and goals of the interview, to help the translators understand how best to help succeed. The translator should also be available to the photographer, who will need their help coordinating and directing their shots.
- In translating your questions to the subject, encourage your translator to take liberty in explaining or rephrasing your questions if needed. They might need to use language or terms that can be more easily understood by the subject.
- In translating their answers back to you, make sure your translator takes no liberties! They must retain the detail of answers exactly as they were spoken, rather than paraphrasing, summarising, or worse still, using development jargon. If a translator uses development jargon, ask the subject to elaborate in plain language.
- Your translator should feel free to ask the subject to pause, in order to translate a portion of an answer back to you, so that they don’t forget details. And once they have done so, can ask the subject to continue from where they left off.
- Your translator should use the first person voice reciting as close to the exact words the subject used as possible. For example: “My name is Alice and I have two daughters” rather than “Her name is Alice and she has two daughters”.
- Speak directly to the person you are interviewing rather than talking to the translator. The interview subject should still feel like you are speaking to them.
- Sit the translator close by so that they feel a part of the conversation. This could be just next to you, or next to your interview subject – figure out a way that works for everyone, and resist the temptation to turn to face your translator to hear answers – keep your focus on your interview subject.
- Encourage your translator to suggest follow-up questions. The best translators will understand your needs, and should feel empowered to offer their own questions to get the responses you are after. It is important that the translator explains to you what is going on, so you don’t lose control of the conversation.
Your translator should explain any colloquial terms which could add real local colour to your interviews. They may need to be spelled out.
Interview guidance
The aim of our interviews is to get a lot of answers which cover two things: facts and feelings. Facts are important because we need to know the details of their life, and the ways in which CARE has helped. And feelings are important because people care about people – and we all experience feelings of pain, and fear, and gratitude, and happiness. The person’s feelings are what will connect most with our audiences.
We interview people by quickly forming a bond with the person and ensuring we feel welcome in their home. Only when the ice has been broken can a person truly open up and discuss their feelings. So when everyone is ready, we ask a series of personal questions which fit into the following categories:
- CONTEXT: Who is she? Where does she live? How many in her family? What is life like here?
- PROBLEM: What obstacles or challenges did she face before CARE’s involvement?
- SOLUTION: What has CARE done/taught her to help her overcome those problems?
- IMPACT: How is her life different now? What is better? What has changed?
- FUTURE: What are her hopes and fears for herself and her family’s future?
Always be inquisitive and prepared to ask follow up questions. Asking ‘why is…’, ‘when was…’, or ‘how do…’, to almost every answer you receive will elicit more facts and feelings which can be vital to learning more about the person’s life. See below and here for interviewing tips.
Almost every answer can be followed up with ‘How did that make you feel?’ – which is just about the most important question you can ask, because we need to know about their feelings.
Quick tips
- Conduct interviews first and then capture photographs or broll based on the their responses (so then you have the story in words and pictures)
- Begin with simple questions to build a relationship.
- Conduct the interview in a place where the person is comfortable.
- Conduct the interview in private – away from husbands or community leaders.
- Do not suggest answers to the interviewee – make sure the answers are their own.
- Give the person time to answer; it can take a while to respond to questions.
- Be prepared to explore new ideas and different areas of questioning.
- Ask lots of open ended questions that start with the words why how or what
- Pay attention; the person’s answers should determine what your follow up questions will be.
- If the person describes the role of their children or spouse in their interview, also ask them some appropriate questions as well.
- It is important to ask CARE/partner staff questions about the program as well to get specific details and information about implementation costs.